Christmas time is nearing, such an exciting time for us makers. Well, this family portrait embroidery is a great gift for a million other occasions like a housewarming present, celebrating the birth of a baby and so on.
Instead of printing out your family photos why not make an embroidered family portrait this time. This mashup of two of your favorite hobbies photography and embroidery combined could be the ultimate gift.
As daunting and complex they may look, making a family portrait embroidery is relatively simple even for someone who is just a beginner. And, I’m going to show you how to do a family portrait embroidery in five simple steps.
How to make a family portrait embroidery:
- Pick the image/photo you want to transform to embroidery.
- Decide the size of hoop and the size of the finished embroidery.
- Scale image to your desired size.
- Transfer the image to the fabric.
- Pick out thread colors and the stitch that you want to use.
But, before you begin you will also need to figure out where you want the embroidery to be. Whether you want it on a piece of clothing, a sweater/dress, a bag or just as a framed piece of decor. Your options are endless.
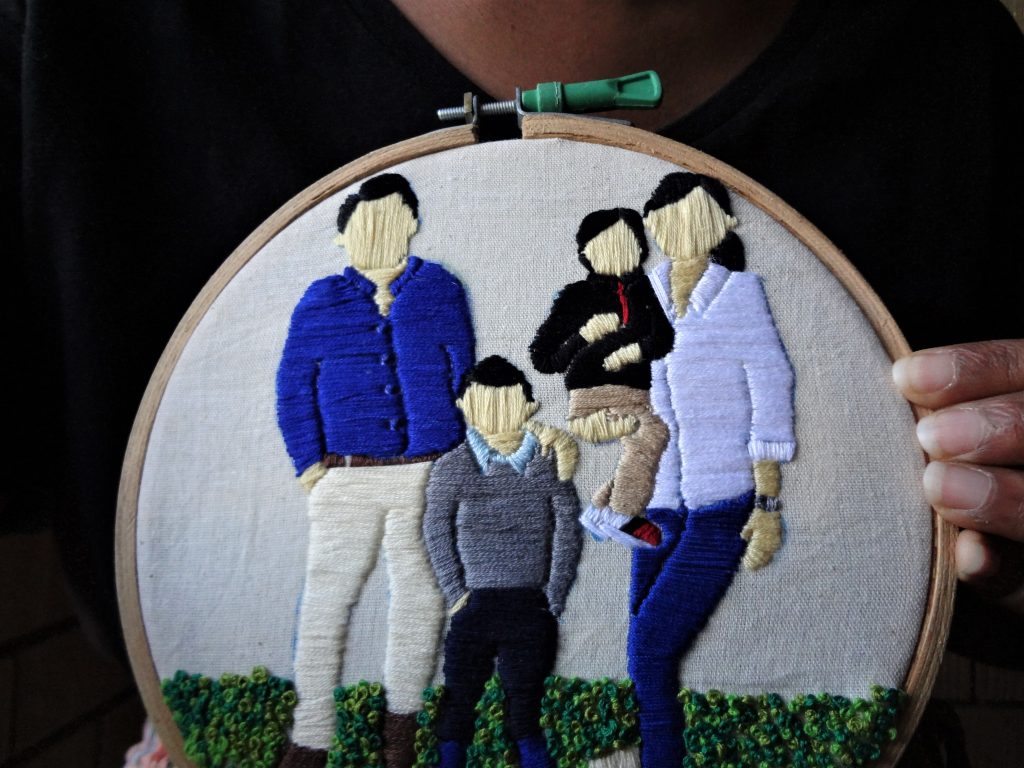
Here’s a picture of the family portrait that stayed on the hoop and was put on the wall just like that.

So, what fabric to use to work your family portrait embroidery?
That depends on the stitch that you are going to use. If you are not doing any counted work, like the stitches in the pictures here, go for cotton muslin/ linen or just about any even weave fabric. And the general rule applies whatever the fabric may be, choose a color contrasting your stitches to help your work look more pronounced.
Step 1: Pick the image/photo you want to transform to embroidery.
My personal preference to do embroidery is a full size image of the person you are going to make. That way you can skip the details that go on to the face like eyes, which can be really hard to get it right using threads. And you can concentrate embroidering the colorful/fun features like outfits and accessories.
The backdrop of the image is of least importance as you can add/remove details to your hoop to your liking.
So, pick a photo in which every member of the family is full-size.
Step 2: Decide the size of hoop and the size of the finished embroidery.
Next important step is to decide how big you want your hoop and finished work. Anything that is more than 10 inches hoop is time consuming. If you are pressed for time, please choose a hoop which is smaller than 10 inches. Because unlike floral embroideries, there’s so much detailing that goes into a family portrait embroidery and it is best to keep it relatively small.
But don’t go for too small, then you many not be able to fit in every cute little detail from the photograph thereby losing the very essence of embroidering your photo.
Step 3: Scale image to your desired size
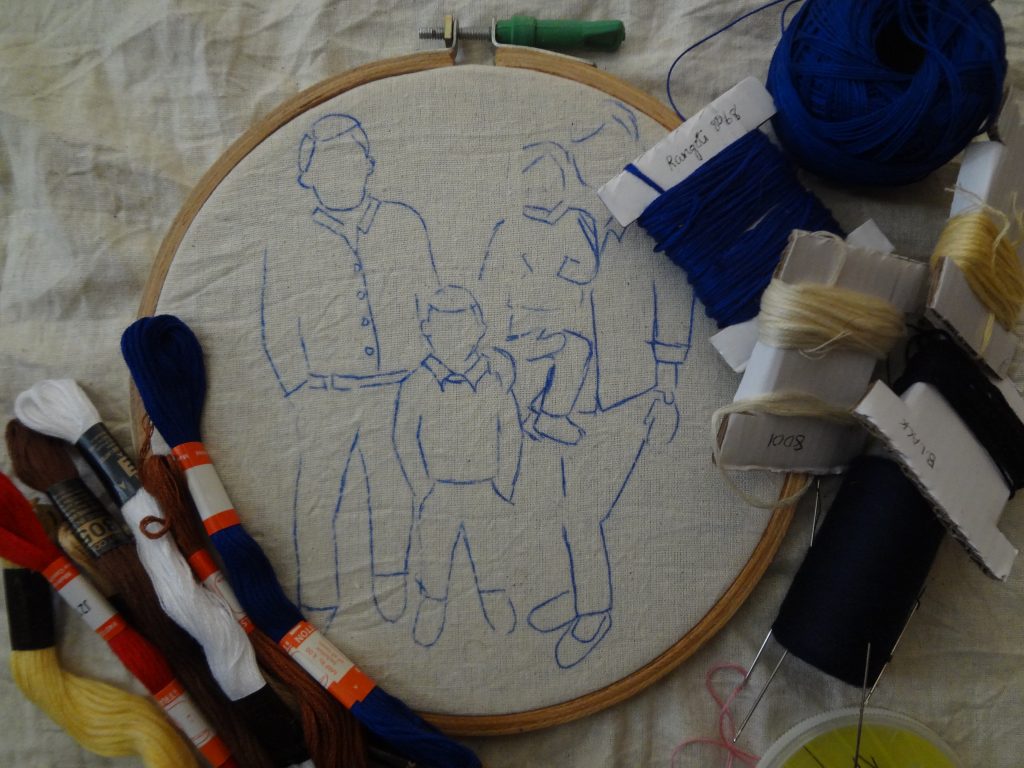
After you’ve decided on you hoop, you need to scale your digital copy of the photograph to your desired size. I use the humble Paint 3D software on my Windows laptop to do it.
Then I turned the photo to a black and white sketch. There are tons of applications that can do that for you. I used the Sketch Me app to do it.
The sketch helps in copying the image to the fabric easily compared to its colored version. Copy the outlines and all the details that you want to include in your embroidery.
Step 4: Transfer the image to the fabric for embroidery.
Transferring the image to your fabric is a big step, as insignificant it may seem. Use transferring methods that do not stain your fabric, because you wont be washing this type of work and any marks that it might leave behind will affect your work greatly.
For light fabrics you can directly transfer from the black and white sketch photo that you printed out, by tracing the outline with a water soluble pencil/pen.
For dark, thick fabrics use carbon copy transfer. Please use a light-colored piece of carbon paper, just in case the ink is a bit stubborn when washing it out. Unlike me who decided that I would use a jet black ink on a white linen fabric, I can still see the marks that it left behind.
To transfer a design using carbon copy paper, lay the fabric face-up. Place the carbon copy paper over the fabric having the sticky ink toward the fabric, and place the pattern on top of it. Now, copy the design using a blunt pencil or ball point pen.
Make sure you’ve got all the outlines onto the fabric, without skipping any bits. Do not take a peep till you are fully finished, because aligning it back again would be tricky.
Caution: Do not press too hard on the carbon paper anywhere else other than your design the ink coating on it can transfer and leaves a big smudge.
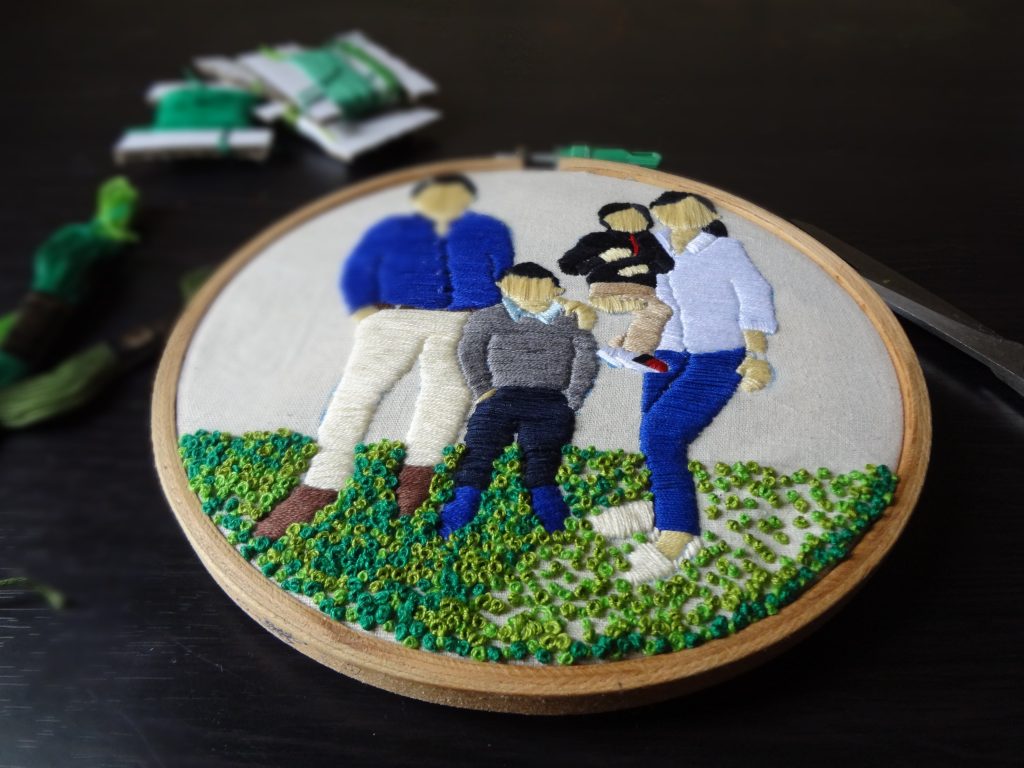
Step 5: Pick out thread colors and the stitch that you want to use.
From now on, it starts to get so much more enjoyable. Choose thread colors that copy colors from the photograph to make it a much better keepsake. Make sure that the thread colors are contrasting the fabric colors.
No rules there in choosing your stitches, just unleash your creative dragon. I am not a big risk-taker, so I’ve kept it simple with these stitches.
Embroidery stitches used:
- Satin stitch
- French knots
So let me know how you go with it. Talk to me in the comments if you have any doubts.