
Free pattern to crochet a small standing dog amigurumi toy. The PDF version of the small standing dog amigurumi pattern can be found here: https://www.ravelry.com/patterns/library/small-standing-dog. Please buy it!
The special feature of this pattern is that the legs and body are crocheted together in one piece. This makes the dog’s body look seamless and extra cute.
Crochet your own palm sized small standing dog using this free pattern. Feel free to refer the video to help you understand the pattern.


Materials Needed
- 4 Seasons Flinders Cotton 8Ply Yarn 50 g
- 2.75mm hook
- 9mm safety eyes
- Tapestry needle, washable filling
Dog’s Head Pattern
Start from the dog’s nose(muzzle), work with white yarn.
- Magic circle, 8sc. (8)
- 2sc in each st around. (16)
- to 5. sc around. (16)
Attach brown yarn to start working the next round. You will be working with two colors till Round 8. You dont have to carry the other yarn all the way around, except in the place mentioned. Please watch the video to help you understand how to change colors seamlessly.
- [FLO][BROWN] 4sc, [2hdc * 3times] | [WHITE] [2hdc * 2times] | [BROWN] [2hdc * 3times], 4sc. (24)
- [BROWN] 4sc, [2sc * 6times] | [WHITE] 4sc | [BROWN] [2sc * 6times], 4sc. (36)
- [BROWN] 16sc | [WHITE] 4sc | [BROWN] 16sc. (36)
- rep Rnd 8. (36)
You can snip off the white yarn leaving a small tail now, use only brown yarn from the next round.
10. to 13. sc around. (36)
- 14. [4sc, dec] * 6 times. (30)
- 15. [3sc, dec] * 6 times. (24)
- 16. [2sc, dec] * 6 times. (18)
- 17. [sc, dec] * 6 times. (12)
- 18. [dec] * 6 times. (6)
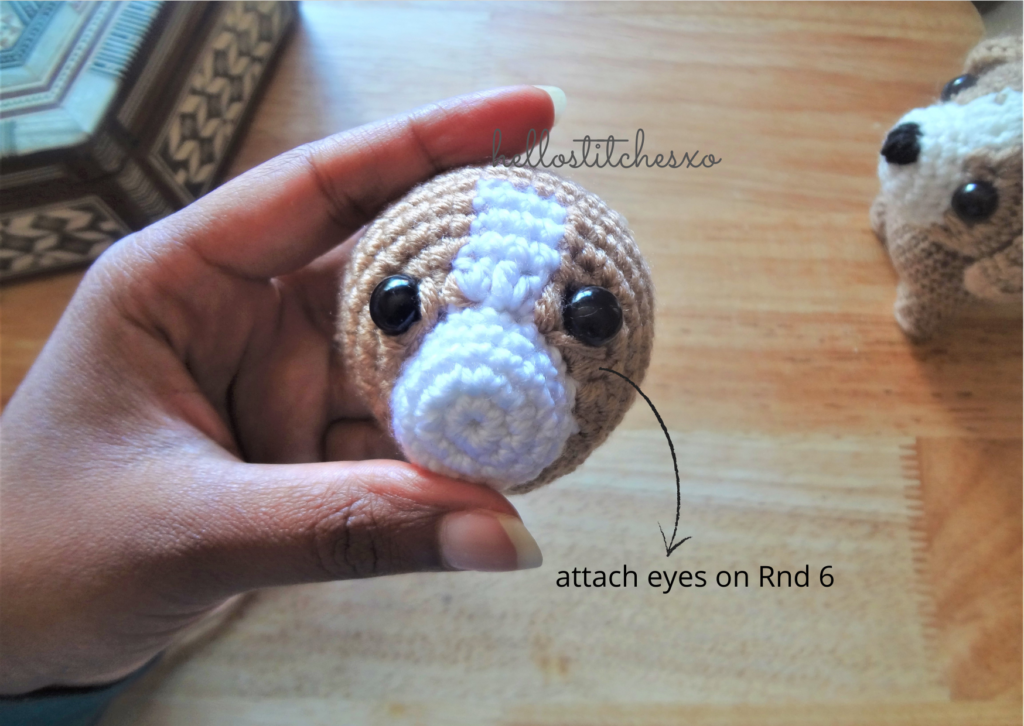
Before you stuff and close the head, remember to fix the safety eyes to the Rnd 6. After you stuff and close the head, embroider the nose.
Dog’s Body Pattern
Start by making four legs at first. Crochet three legs following the pattern below and cut off yarn after finishing each leg. When working with the fourth leg, do not finish off. Instead use the same yarn to work the body of the dog.
- Magic circle, 8 hdc into the magic circle, sl st into the first st to close. (8)
- Work this round into the back loops only[BLO], Ch1, 8 sc. (8)
- Start working in continuous rounds, sc around. (8)
Now that we have made 4 legs, we start joining them.
Joining the 4 legs: Ch 2, 8sc[leg1] , Ch 4, 8sc[leg2], Ch 2, 8sc[leg3], Ch 4, 8sc[leg4]
Top part of the body:
- sc around. [2sc, 8sc, 4sc, 8sc, 2sc, 8sc, 4sc, 8sc] (44)
2-5. sc around. (44)
- Dec, 42sc. (43)
- Dec, dec, 37sc, dec. (40)
- Dec, dec, 34sc, dec. (37)
- Dec, dec, 8sc, skip 15, 8sc, dec. [Please watch the video to help you understand this step]
Bottom part of the body: Attach yarn at the back side, near the leg.
- 2sc, 4sc[leg], 4sc, 4sc[leg], 2sc, 4sc[leg], 4sc, 4sc[leg].
- Dec, dec, dec, 4sc, dec, dec, dec, dec, dec, 4sc, dec, dec. (18)
- Dec, 7sc, dec, 7sc. (16)
Stuff and close the body at the top and bottom. [Please watch the video to help you sew the top and bottom]
Ears:
Chain 5
- Start from the 4th chain from the hook, hdc, hdc. Turn. (3)
- Ch 2, hdc, hdc, hdc inc. Turn. (5)
- Ch 2, hdc, 3hdc, hdc inc. Turn. (7)
- Ch 2, 6hdc. (7)
- Ch 2, 6hdc. (7)
- Ch 2, 6hdc. (7)
- Ch 2, 6hdc. (7)
- Ch 2, 5hdc. (6)
Make two ears, Attach the ears between Rnd 10 to Rnd 14.

Tail:
- Magic circle, 4sc. (4)
- sc around. (4)
- [sc, inc] * 2 times. (6)
- to 5. sc around. (6)
Now sew the head to the body in the place mentioned and you’ve got yourself a small standing dog amigurumi. Let me know if you found this free pattern useful. Thank you!


