
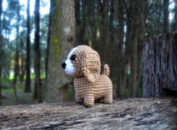
These crochet baby shoes are such great photo props, looks unbelievably cute on a little ones feet. They are not ideal for walking, but work best as crib shoes.
Before beginning to work on these shoes it is important to consider the type of wool you would want to be using. You dont want to use some thing that is super fine for the sole, my recommendation would be to use a bit bulkier Acrylic yarn for the sole, or a cotton yarn.
Another great tip when you don’t have these yarn would be to crochet with two strands of the same color for the sole. Because a sole for the show needs to stay flat/sturdy for the shoe to look put together.

So lets get to the crochet baby shoes pattern for 6 month olds.
Items you’ll need
- Bulky yarn for the sole
- Two different color yarns for the top of the shoe.
- Hook : 3.5mm
- Stitch markers
- Tapestry needle
Abbreviations
ch – Chain
sl st – Slip stitch
sc – Single crochet
inc – Make two single crochets in the same stitch
dec – Combine two stitches into one single crochet
hdc – Insert hook, pull the yarn. Now, there’s three loops on your hook. Pull the yarn through all three loops.
[stitch] * ‘n’ times – repeat the stitches between the [] n times.
Recommended Sequence
- Make the sole first.
- Crochet the back bit onto the sole.
- Separately crochet the top part of the shoe.
- SC it to the shoe.
Video help to the pattern
Youtube: Crochet baby shoes
The pattern to make this crochet baby shoes is worked in both loops unless mentioned otherwise.
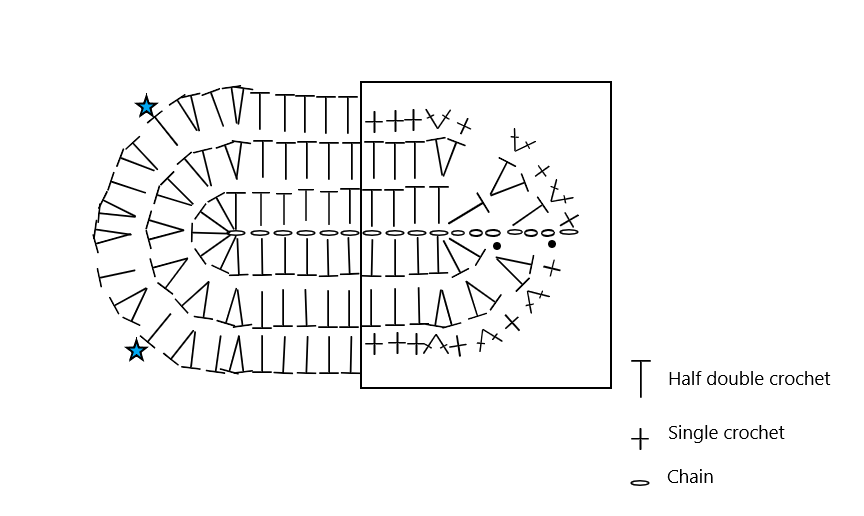
Sole of the crochet baby shoes
Rnd 01: Slip knot, Chain 13. (13)
Rnd 02: Work on both sides of the first row, Start from the 4th chain from the hook(Chain 3 acts as the first HDC). 2HDC, 1HDC till the last before chain. 7HDC in the last chain. 1HDC in the next 8 chains. 3HDC in the beginning chain. sl st to finish to the top of the Chain 3.(29)
Rnd 03: Chain 3(Acts as the first HDC), 1HDC in the same stitch. 2HDC in the next 2 sts. 1HDC in the next 8sts. 2HDC in the next 7sts. 1HDC in the next 8sts. 2HDC in the next 3sts. sl st to finish to the top of Chain 3. (42)
Rnd 04: Chain 1(Does not count). 1SC in that st. 2SC in the next. [1SC, SC inc] * 2 times. 1SC in the next 3 sts. Place a stitch marker. 1HDC in the next 5 sts. [2HDC, 1HDC] * 3 times. 2HDC in the next 2 sts. [1HDC, 2HDC] * 3 times. 1HDC in the next 5 sts. 1SC in the next 3 sts.Place a stitch marker in the first SC. [2SC, 1SC] * 3 times. sl st to finish off. (56)
Also, don’t forget to place stitch markers in the places marked with stars.
Back side of the crochet baby shoes
The square in Fig 1 indicates the place where the back bit is worked into.
Row 01: Start from where the stitch marker is placed. SC with the dark blue colored yarn. 24SC. Turn.(24)
Row 02: Chain 1, 2SC in the first st, 22SC across, 2SC in the last st. Turn. (26)
Row 03: Chain 1, 2SC in the first st, 24SC across, 2SC in the last st. Turn. (28)
Row 04: Chain 1, 2SC in the first st, 26SC across, 2SC in the last st. Turn. (30)
Row 05: Chain 1, 2SC in the first st, 28SC across, 2SC in the last st. Turn. (32)
Row 06: Chain 1, SC around. Finish off. (32)
Please refer the video to know how to sew the ends to the sole.

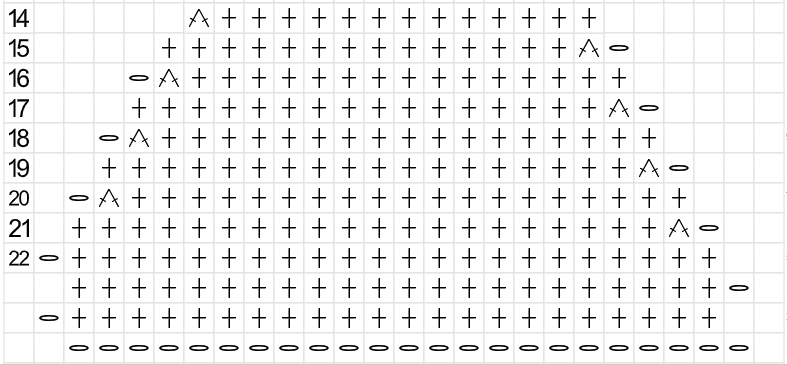
Top part of the crochet baby shoes
Row 01: Slip knot, Chain 23. Starting from the 2nd chain from the hook. 22SC. Turn. (22)
Row 02: Ch 1, SC till the last st. Turn. (22)
Row 03: Ch 1, SC till the last st. Turn. (22)
Row 04: Ch 1, 20SC, dec. Turn. (21)
Row 05: Ch 1, 19SC, dec. Turn. (20)
Row 06: Ch 1, 18SC, dec. Turn. (19)
Row 07: Ch 1, 17SC, dec. Turn. (18)
Row 08: Ch 1, 16SC, dec. Turn. (17)
Row 09: Ch 1, 15SC, dec. Turn. (16)
Row 10: Ch 1, 14SC, dec. Turn. (15)
Row 11: Ch 1, 13SC, dec. Turn. Finish off. (14)
Please refer the video to see how it is attached to the shoe.


Share your comments