Are you excited for the second installment of the movie? I am so much more excited that Gal Gadot is donning her cape once again, to be screened Wonder woman. This Wonder Woman toy would be the right addition to your crochet superheros, right in time.
The pattern is similar to that free Superman pattern here on the blog. But, looking at the pictures I think my craftsmanship has come a long way since. I have also leveled up my pattern writing skills, thanks to the feedback from people like you.
I am super proud of how the Wonder Woman toy pattern had turned out, I hope you have fun making it. Like always please let me know if you have any clarifications with it.

Wonder Woman
Height: 18cms tall
Skill Level: Intermediate-Advanced

Supplies:
2.5 mm hook
Stitch markers
Tapestry needle
Fiberfill
Yarn – 8 ply Acrylic yarn in cream, black, red, blue and yellow
Notes:
Abbreviations:
ch – chain
sl st – slip stitch
sc – single crochet
inc – make two single crochets in the same stitch
dec – combine two stitches into one single crochet
inv dec – insert hook into the front loop of the first stitch. DO NOT YARN OVER. Insert hook into the front loop of the next stitch. To do this you’ll need to swing the hook down first so you can insert the hook. Yarn over and draw through the first two loops. You are now left with two loops on the hook. Yarn over and draw through two loops.
[stitch] * ‘n’ times – repeat the stitches between the [] n times.
General instructions:
- Work in both loops unless the pattern instructs you to do otherwise.
- Work all the stitches in continuous rounds in a spiral. Do not join. In other words do not sl st and chain at the end of each row, instead simply follow the pattern for the next round.
- Use a stitch marker to keep track of the rounds.
Recommended sequence:
- Crochet the head.
- Crochet the hair cap.
- Crochet hair bits/extensions, sew them to the hair cap.
- Crochet legs and onto the body. Do not forget to observe the color changes.
- Crochet arms.
- Crochet skirt.
- Crochet the shoes.
- Stuff face and sew the hair cap to the head.
- Stuff body and attach arms, shoes, skirt.
- Embroider eyes, sew crown and sew body to the head.
Now off to crocheting this cute Wonder Woman toy.
Head
The graph should be helpful to crochet the first four rounds of the head if you are not a written pattern person.
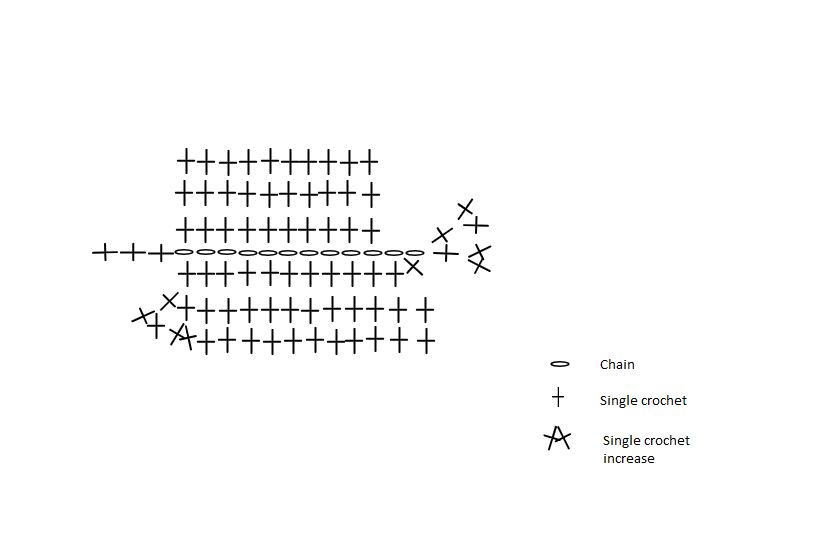
Rnd 01: Chain 12
Rnd 02: sc in the third chain from the hook, Then 9sc till the last before chain, 3sc in the last chain and turn. Now working in the bottom half/opposite side of the chain, 9sc, 2sc in the last. (24)

Rnd 03: inc, 11sc, inc, 11sc. (26)
Rnd 04: 2inc, 11sc, 2inc, 11sc. (30)
Rnd 05: 3inc, 12sc, 3inc, 12sc. (36)
Rnd 06 – 09: sc around. (36)
Rnd 10: 2sc, 3inc, 15sc, 3inc, 13sc. (42) // Starting the cheeks/ears portion of the face
Rnd 11 – 15: sc around. (42)
Rnd 16: [5sc, invdec] * 6 times. (36)
Rnd 17: [4sc, invdec] * 6 times. (30)
Rnd 18: [3sc, invdec] * 6 times. (24)
Rnd 19: [2sc, invdec] * 6 times. (18)
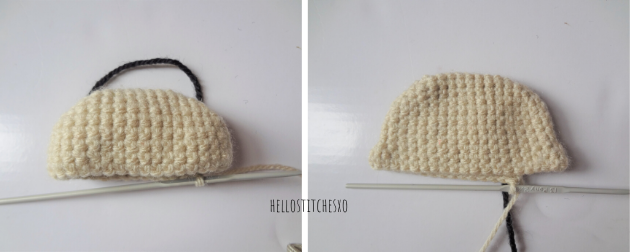
Hair Cap
After you have completed the head, it will be lot easier to follow the pattern for the hair cap.
- Chain 14
- sc in the third chain from the hook, Then 11sc till the last before chain, 3sc in the last chain and turn. Now working in the bottom half/opposite side of the chain, 11sc, 2sc in the last. (28)
- inc, 13sc, inc, 13sc. (30)
- 2inc, 13sc, 2inc, 13sc. (34)
- 3inc, 14sc, 3inc, 14sc. (40)
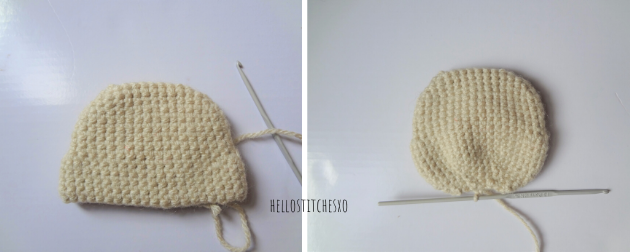
- 16sc, 14sl st. (40)
- 26sc, turn. (26)
- Ch 1, 26sc, turn. (26)
- Ch 1, 26sc, turn. (26)
- Ch 1, 26sc, turn. (26)
- Ch 1, sl st 4, 18sc, sl st 4, turn.
- Ch 1, sl st 4, 18sc, sl st 4, turn.
- Ch 1, sl st 4, 18sc, sl st 1, turn.
- Ch 1, 18sc, turn.
- Ch 1, 18sc, turn.
- Ch 1, 18sc, turn.
- Ch 1, 18sc, turn.

Hair Extensions
Tip 1: Remember to ensure that the chains are not twisted to make an uniform band at the top for Wonder Woman’s hair.
Tip 2: For the lengthy extension, repeat this step for 9 times or to a length you desire depending of how fuller you want your curls. But I felt like the head looked fuller already.
- Chain 22.
- SC in each chain. (Without finishing off repeat step 1 & 2 for 9 times.
Tip 3: For the short extensions, increase 2 chains for an increasing/decreasing length of hair.
- Chain 20.
- SC in each chain. (Without finishing off, repeat step 1 & 2 for 4 times but with an increase of 2 chains each time)
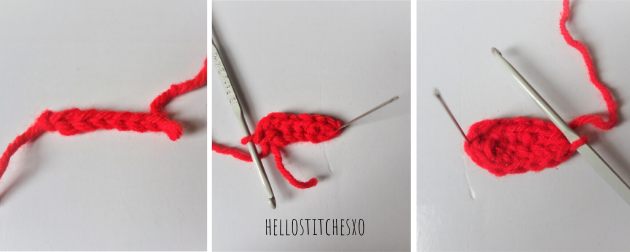
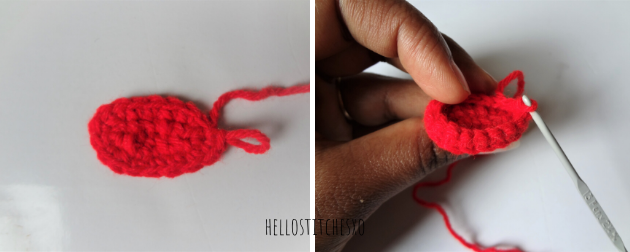
Body
Start with the legs,
Rnd 01: Magic circle, 10sc. (10)
Rnd 02: sc around. (10)
Rnd 03 – 13: sc around. (10) // Make two of these legs, then change to red color.
Rnd 14: 10sc, Ch 2, 10sc, Ch2, Join.
Rnd 15: sc around. (24)
Rnd 16: [3sc, inc] * 6 times. (30)
Rnd 17 – 25: sc around. (30) // Now, change to skin color yarn again
Rnd 26: sc around. (3)
Rnd 27: [3sc, invdec] * 6 times. (24)
Rnd 28: [2sc, invdec] * 6 times. (18)
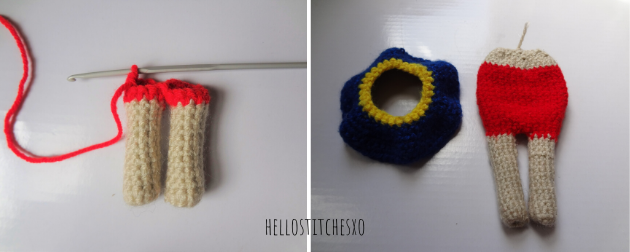
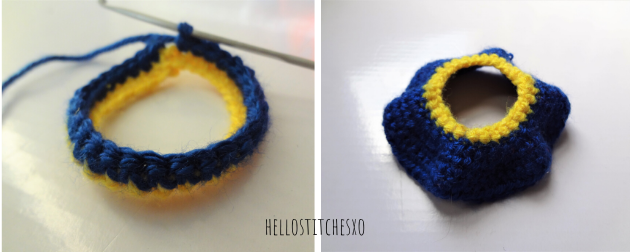
Skirt
Use yellow color yarn to start making a skirt for your Wonder Woman toy.
Rnd 01: Chain 30, join with the beginning chain.
Rnd 02: SC 30, sl st in to the first SC. Join blue yarn.
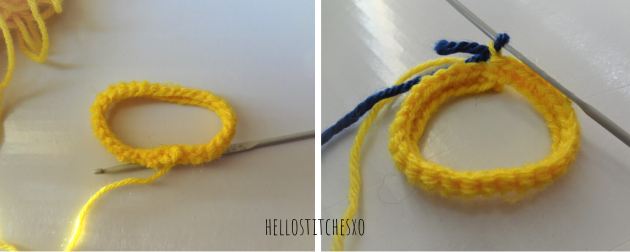
Rnd 03: SC 30, sl st in to the first SC.
Rnd 04: Ch2 (counts as first HDC), HDC in the same st. 2 HDC in each st around. (60). Join.
Rnd 05: Ch1, SC 60. sl st to finish off.
Arms
Rnd 01: Magic circle, 6 SC.
Rnd 02: [SC, SC, inc] * 2 times. (8)
Rnd 03-13: SC around. (8)
Crown
Row 01: Chain 16. (16)
Row 02: In the 2nd chain from the hook, 3SC, 3HDC, 3DC, 3HDC, 3SC. Finish off.
Neckline
Chain 48 and sew it in a W shape on top of the red dress of your Wonder Woman toy.
Shoes
Rnd 01: Ch 6. (6)
Rnd 02: 4sc, 3sc in the next stitch,continue on the opposite side of the chain. 3sc, 2sc in the last stitch. (12)
Rnd 03: 2sc in the first st, 3sc, 2sc in the next 3 stitches, 4sc, 2sc in the last st. (17)
Rnd 04: sc around. (back loops only) (17)
Rnd 05: 5sc, dec, 8sc, dec, dec, 7sc. (15)
Rnd 06: 4sc, dec, dec, 6sc. (12)
Rnd 07: sc around. (12) Stuff and sew it to the legs.